ShopDreamUp AI ArtDreamUp
Deviation Actions
Suggested Deviants


Suggested Collections


You Might Like…


Description
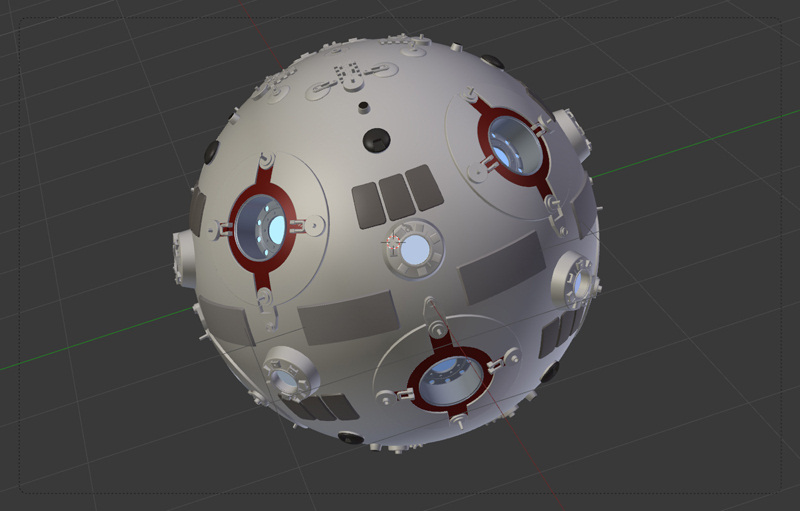
Jedi Training Remote Episode II Free 3D Model Version 1.1 - Created In Blender 3D 2.49b (This version is for Blender 2.5x or newer)
Version 1.1 has a few corrected normal directions, that's all.
Note: There is also a new third model version 2.0 with much higher polygonal resolution and it is also more precise and therefore even closer in appearance to the prop used in the movie. Look for it in my gallery here in Deviantart.
Note: In the documents included with the .zip file it is mentioned as an Episode I model but this is just a typo that I continued to carry forward so in reality this newer looking Jedi Training Remote appears in Episode II not Episode I.
This is a 3D model of the Jedi Training Remote that did a while ago but I had not released the free 3D model yet, I had only released a wallpaper and some icons that I made with it. It has no texture artwork yet, I never got to do that so it is more like the one in Episode I cause those were newer. If anybody wants to texture it I will publish it and credit the person for the texturing.
You can see the model in 3D in real-time in your browser here (it doesn't need any plugins):
Higher polygons: p3d.in/sErBD/spin
Lower polygons: p3d.in/DZQRL/spin
You can use your left mouse button to interact with it and with the mouse wheel you can zoom in and out. Also in the buttons to the left side you can change the type of shading. If your graphic card provides good anti-aliasing it will look even better. It's pretty cool.
It was created in Blender 2.49b cause it was created a while ago so you can open it with the old Blender and the newer ones without any problems.
The zip file has two versions, a lower poly one (130,730 vertices and 85,313 faces) and one with a higher number of polygons (253,154 vertices and 225,949 faces). The one with higher polygon count has many rounded edges that make the renderings look better. The scene has more polygons because it has some objects that serve as a background which I used to create the wallpaper.
The slight glows that you see in the wallpaper were post processing glow effects that I did in Photoshop CS4 with some masking of some areas and some blurring but they could easily be done in many other paint or photo editing programs such as The Gimp.
I know that it still doesn’t have the textures and that those can make it look more realistic, but it is still the way it appears in Episode II (with the young padawan students) as far as I know cause in Episode IV when Luke uses one it is very old, although I’m not sure about how old the ones in Episode II should look like I presume that those were much newer and cleaner in the times were the Jedi Knights were treated much better by the republic so it could still be “movie like” except that it would be more like those in Episode II.
The sphere object in another layer is for background reflection for the chromed parts. I included a texture with the file that is linked to the sphere material with a relative path. It really is a beauty salon but it is a very modern or perhaps futuristic beauty salon that actually looks very Star Wars like so I though that it would be more than adequate as a reflection background.
One small warning: The model is OK but not all objects are as well instanced as they should be.
I made two files, one for Blender 2.49b and one for Blender 2.5x-2.6x (Two different submissions in my Deviantart gallery). The reason is that a lot of people still use the old Blender and it only has Blender units as measurements so the sphere is 6 Blender units in diameter and each Blender unit represents an inch cause the real Jedi Training Remote has 6 inches of diameter in the sphere (without the ornaments, without the greebles) as far as I know. In Blender 2.5x new measurements methods were introduced as many of you know so I changed the units to Imperial and scaled the whole scene until the sphere has 6 inches of diameter like the real world movie prop. So you have zip file 1 that includes the high poly and lower poly Blender 2.49b version and zip file 2 that has the Blender 2.5x-2.6x version as separate downloads but the models are really exactly the same, only the scaling is changed. That’s all! Enjoy the model!
Comments1
Join the community to add your comment. Already a deviant? Log In
Great model! I'd love to see a short tutorial on how you did.